Inner Blocks
Inner blocks, or nested blocks, is a component from the @wordpress/block-editor package that allows a parent block to use other child blocks for its structure. These child blocks in the Inner Blocks component can be free form, allowing the child blocks to be rearranged, create multiples of, or locked into a specific pattern.
There is more control over how inner blocks are presented, vs. block patterns, which are basically a suggested template that can be modified. Inner blocks can be locked into a specific pattern, or allow modification, but only with a restricted list of blocks.
A few resources:
- WordPress Developer Resources: Nested Blocks
- Brian Coords: Build Custom Blocks Using InnerBlocks
The video has a great explainer and example - baker.dev: InnerBlocks: Gutenberg’s Secret Weapon
To get started, create a new block by running
npm run new-id-blockWithin the new block folder, edit.js and save.js are the two folders to work with. Below is sample code from Brian Coords:
The two sections for edit.js are the import call and the edit function:
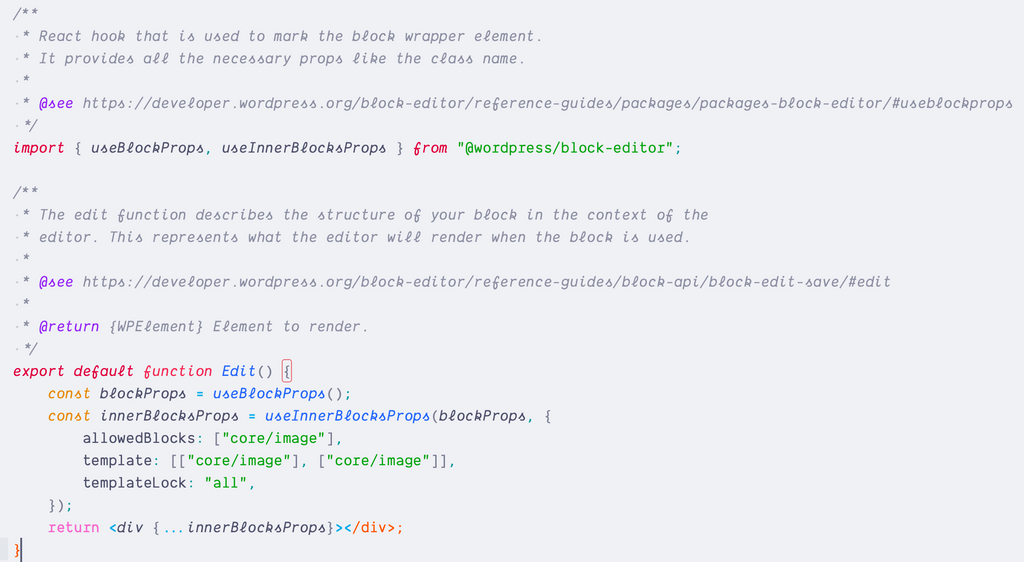
Within the Edit function, there are a few arguments/settings:
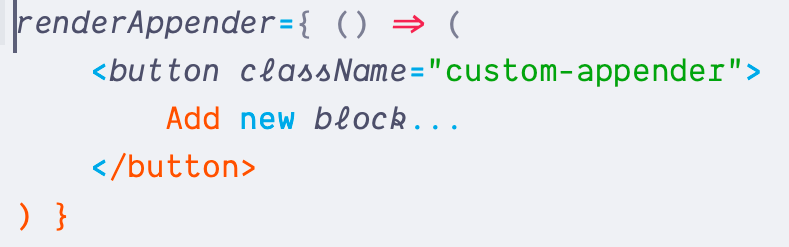
allowedBlocks– The core or custom blocks that are allowed to be used within the InnerBlocktemplate– The initial layout for the blocks when there is no content.templateLock– This allows the flexibility for the block. In the example, “all” means that it is fully locked, and the user cannot make modifications to add/remove blocks or move them around. The link shows the other settings for thetemplateLock.orientation– This one isn’t in the example, but is worth mentioning. This gives the direction (horizontal/vertical) the blocks are laid out. This property controls the orientation of the “move block” arrows that appear on the Block Toolbar for each child block inside the Inner Blocks component.renderAppender– If you want to customize the “Add a block” experience, this is the setting for you. The documentation is sparse, but basically you can display the plus icon, nothing at all, or customize the look:
save.js is more straightforward:

All the save function requires is the InnerBlocks.Content tag, and it will render on the frontend.
Dynamic Blocks: It’s important to note that in a dynamic block with a PHP template you still need to have a save function in Javascript to save the InnerBlocks content. You don’t have to save all of the rest of the markup of your parent block, but the InnerBlocks.Content has to saved so that the markup and block grammar of the child blocks is saved to the post_content.
useInnerBlockProps
With Block API 2, we can have greater control over the markup of the Inner Blocks component in the editor by using the useInnerBlockProps hook. This is the inner blocks version of the useBlockProps hook. See the handbook page on that hook.
In the edit function import the hook from the @wordpress/block-editor package:
import { useBlockProps, useInnerBlocksProps } from '@wordpress/block-editor';In your edit function define useInnerBlockProps and pass it an object with any of the parameters you want to output on the HTML element that useInnerBlockProps is spread on. These are optional, but most often you’ll want to use this for modifying the className. Or adding data attributes.
Then on the HTML element use the ...spread syntax to output those parameters on the HTML markup.
export function BlockEdit() {
    const blockProps = useBlockProps();
    const innerBlockProps = useInnerBlocksProps({
        style: {
          color: '#222222',
          backgroundColor: '#eeeeee',
          padding: '15px'
        },
        className: isSelected ? 'additional-class' : '',
        'data-test': 'data attributes'
    });

    return (
        <div {...blockProps}>
            <div {...innerBlockProps} />
        </div>
    )
};
In Save.js you’ll want to do the same as above if using useInnerBlocksProps but you’ll add the .save() method to the end when calling it. Like so:
const innerBlockProps = useInnerBlocksProps.save({
        style: {
          color: '#222222',
          backgroundColor: '#eeeeee',
          padding: '15px'
        },
        className: isSelected ? 'additional-class' : '',
        'data-test': 'data attributes'
    });
See the page on useBlockProps for more details and documentation.
Accessing Data Between Blocks
Child block data from Parent
Accessing the data of the child blocks from the parent via JavaScript is straightforward, via the @wordpress/data module:
const { __ } = wp.i18n;
const { useSelect } = wp.data;
const { store: blockEditorStore } = wp.blockEditor;

/**
 * Block Edit Component
 */
const Edit = (props) => {
	const { clientId } = props;
	const innerBlocks = useSelect(
		(select) => select(blockEditorStore).getBlock(clientId).innerBlocks,
	);

	console.log( innerBlocks ); // This will log all the inner blocks on your browser console
};
For dynamic blocks, using the WP_Block class in render.php will give you access to the child data:
<?php
/**
 * Render Custom Block
 *
 * @param  array    $atts    Block Attributes
 * @param  string   $content Block Content (InnerBlocks)
 * @param WP_Block $block_class Block Class Instance
 * @return string          Block Markup
 */
function render( $atts, $content, $block_class ) {
	// Check how many inner blocks are available
	$item_count = $block_class->inner_blocks->count();
	if ( empty( $item_count ) ) {
		return '';
	}
	ob_start();
	?>
	<div>
		<?php
		foreach( $block_class->inner_blocks as $_block ) {
			// Get the inner block data
			$inner_block = $block_class->inner_blocks->current();

			// Holds the inner block attribute
			$attribute   = $inner_block->attributes;

			// This will display the attributes data
			var_dump( $attribute );

			// increase the index in the WP_Block_List class used to retrieve the current block
			$block_class->inner_blocks->next();
		}

		// reset the index in the WP_Block_List class to the initial state
		$block_class->inner_blocks->rewind();
		?>
	</div>
	<?php
	return ob_get_clean();
}
Adding Context
Using the Block Context feature, you can specify what data can transverse between Inner Blocks.
From within registerBlockType, add a providesContext block to the block that wants to share data:
registerBlockType( 'my-plugin/record', {
    // ... cut ...

    attributes: {
        recordId: {
            type: 'number',
        },
    },

    providesContext: {
        'my-plugin/recordId': 'recordId',
    },
...
In the receiving block, add a useContext statement:
registerBlockType( 'my-plugin/record-title', {
    title: 'Record Title',
    category: 'widgets',

    usesContext: [ 'my-plugin/recordId' ],
    edit( { context } ) {
        return 'The record ID: ' + context[ 'my-plugin/recordId' ];
    },
...
For all the php folks out there:
register_block_type( 'my-plugin/record-title', array(
    'render_callback' => function( $attributes, $content, $block ) {
        return 'The current record ID is: ' . $block->context['my-plugin/recordId'];
    },
) );
For more information and a complete example, see the Developer Reference Guide on Context.